The blog has moved, and this post can now be found here:
https://peculiarseamstress.blog/2018/01/05/a-plaid-skirt/

Showing posts with label clothes for the 21st century. Show all posts
Showing posts with label clothes for the 21st century. Show all posts
Friday, 5 January 2018

Friday, 13 January 2017
The Red Riding Hood Winter Coat
Way back in 2009 I picked up a piece of cheery wine red wool at a good price in a fabric shop that was closing. I wanted to make a winter coat from it, but there wasn’t enough for what I had in mind. Soon afterwards I stumbled on a piece of wool in the same quality, but a shade or two darker, in a charity shop, at an even better price. This could work, and I quickly cut out some of the pieces for it. And then life happened. And happened again, and again. I would pick it up, do some work on it, and then it would creep back into the UFO pile.

When I got it out this summer, seven years and two children later, it didn’t fit very well. I had to do some hard thinking, and then, with the help of piecing and added panels, will it to do as I wanted it to. In the end, the finished result turned out all right, if not perfect. The style had changed a little since I cut out the first pieces, but overall for the better, I think. The coat itself is made from the lighter red wool, which also lines the hood and pelerine collar made from the darker red wool – the winters here are mostly wet and windy, and the cold goes straight through you. Extra layers of wool are a good thing. The coat is also piped here and there in the darker red wool. In the pictures, the contrast between the lighter and darker fabrics show best in the hood.

For the construction of the hood I took my
inspiration from 18th century hoods, with the pleats radiating out
in the back. Since mine was made from double layers of thick wool, the centre of
the pleats wouldn’t quite close, so I covered a button in a scrap of wool and
stitched it over the hole.

When it was time to line the pelerine collar,
I didn’t have any piece of fabric large enough, so I ended up piecing it
together from twelve smaller scraps. The facings in the front is also pieced
together from four pieces each, and both the sleeves and the lining of the hood ended up being pieced from two
pieces each. I wanted a long row of buttons down the front,
and luckily I’d salvaged a dozen buttons from an old, worn-out coat I’d made, which would
do quite well. I put two of them in the back, and the remaining ten down the front. Even the lining was reused from something else. All in all, the coat looks nice, maybe even expensive, but it’s all
clever scrimping and recycling. Elegant economy, as they say in Cranford.

One morning about a week ago it was snowing,
and of course I’d have to take the opportunity to get pictures of the coat. After
all, a backdrop of snow is much prettier than a backdrop of mud and sad looking,
beat down grass.

Ever had to completely remodel a project after
taking it from an extended time in the UFO pile?
Friday, 3 June 2016
Thursday, 7 April 2016
Friday, 15 January 2016
Wool Skirt Makeover
Way back in 2009 I made a wool
skirt that have seen a lot of use during the winters:


Since I had children
though, it hasn’t fitted very well. It was made to fit snugly round the hips, but
pregnancy and childbirth can cause big changes to one’s figure. The skirt was now
too narrow over the hips, and kept riding up, which also made it shorter than I appreciate. As I still like the skirt, and want
it to look nice on my present figure, I gave it a makeover.

The original skirt had
an 8 centimetre deep hem. I let this down, and faced it with some grey bias
tape I’d had in my stash for ever.

I cut the top of the
fitted portion, and piped it with the grey band I’d cut off. Instead of the old
and broken zip, I put in three buttons, also from my stash.

A small makeover, and
now I’m happy with the skirt again.
Sunday, 25 October 2015
Lace-on Sleeves for the Cinderella Dress
One of my all-time
favourite dresses (that's not historical or some kind of costume) is the olive green “Cinderella dress” I made a couple of years ago. I love to wear it with delicate blouses in
the summer, but adding sweaters in the autumn takes away from the look I think.


I decided to add detachable sleeves, and thus extend the season for it a bit. I
asked for advice as to how best to go about it, and the lovely Alessandra told
me of her experience with something I was leaning towards, and ended up doing.

I did have a bit more of
the dress fabric left, but not enough to make full length sleeves without
piecing. I decided to make short puffs at the top, and the lower sleeves are
cut on the bias. The puffed part of the sleeves have a slightly shorter, fitted
lining, attached to the lower sleeve, which makes sure the puffs are keeping
their shape nicely.

I put piping at the sleeve head, the seam between upper and
lower sleeve, and at the wrist, matching those on the dress bodice.

The sleeves are
attached by lacing strips around the armscye and sleeve head. I stitched down
the strips on both sides, but left openings every three centimetres, with those of the
sleeves staggered from those in the armscye. I braided a cord from cotton yarn,
and that was it – works a charm.

For now I use laces in a shade close to that of
the dress, but for variety I could use different colours and materials. How
tightly I lace can also be varied, from being so tight the sleeves look
stitched on, to a wide gap between bodice and sleeve.

I think this dress
will need more upgrades to be perfect: it’s a bit tight across the bust - breastfeeding can have that effect - so I’m
thinking of opening up the front seem and adding lacing there too, with a modesty panel from the dress fabric behind it….
Friday, 18 September 2015
Thursday, 3 September 2015
Fuchsia Dress Makeover
When I was expecting
B, I bought a dress. I don’t often buy dresses, preferring to make my own, but
once in a while it happens. It has been used a lot since, mostly during my two
pregnancies, but on other occasions as well, as it’s very
comfortable, and cool in summer. However, it had a few issues. For one it was too short. I don’t
wear clothes shorter than below the knees, and, as even skirts of that length show off my stubby
legs to disadvantage, I most often wear them a fair bit longer than that. When I’ve
been heavily pregnant the dress became almost indecently short in front. As a result, it
has always been worn over a longer skirt, like it is here.


Aren't the mice adorable? I made them for Halloween last year,
and liked them so much I just had to leave them out.
Second, the neckline
was too low in front, especially when the bust increased a size of five during
pregnancy and early nursing. I needed to wear it over a tank top so as not to fall out during those times. (Alas, the difficulty of being "well endowed"; the slightest décolletage will make you look like a wannabe exhibitionist, at least if you're wearing anything more supporting than a nursing bra.) Also, the
elastic was too wide, making the neckline warp in a weird way where it curved.

Third, the sleeves
where a bit too short for my liking, for a similar reason as the overall length.
After thinking the
dress needed a makeover for the past four years,bu never getting round to it, I finally decided it was time. I found a piece of fabric in my stash, a gift from a friend, which would work
well. There was just enough of it to make the changes I wanted.

I unpicked the seams
at neck and sleeves, and removed the elastic. I cut the neckline a bit lower at
the back and sides, as that was high enough already, but left the front be, as I wanted that raised. In retrospect I could have
cut away a bit more at the back and sides. I then stitched a strip of the new fabric to the edge, and
inserted narrower elastic. I did the same for the sleeves, except that I
did not cut them shorter.

For the skirt I just
sewed a strip to the hem. I didn’t have enough material to make it curved like
the skirt, so I had to very lightly pleat a straight strip. Not the neatest job I've ever made,
but it does the trick. I can now wear the dress as it is, with only a light petticoat
under it – the material is quite thin.

I wish the sleeves
were a bit longer though – as it is I still prefer to wear a cardigan with it.

Yet, all in all I’m pleased
with how it turned out. I did all the sewing by machine, a very rare thing for
me. As I did, for once, make a New Year’s resolution this year, to become friends with my
sewing machine, it felt very nice. I have another dress like this one, in a
greyish black, that also need a makeover. I must consider how I want to go
about that, as I want a slightly different design than to this one.
Sunday, 9 August 2015
Wednesday, 11 February 2015
Mending a Petticoat
I often wear some sort
of petticoat under my skirts and dresses. I like the feeling of layers; it
makes the skirts fall in a nicer way, and prevents my legs from getting tangled
in them. One of the ones most frequently worn was made from an old curtain with
a pinked flounce, which I picked up at a charity shop several years ago.
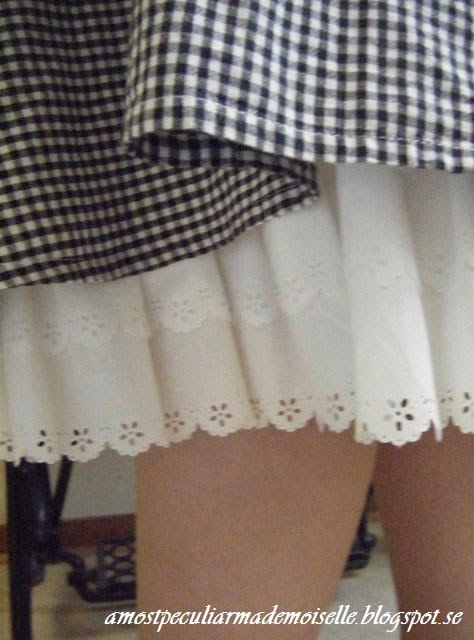


Once it looked this pretty.
The
pinked hem has literally been worn to shreds, and I’ve been meaning to do
something about that for a while, but as it’s hardly ever seen, mending it would be
so boring compared with making new things, and so it just never got done.
And then life happened. Disgraceful.
But then I joined
the Facebook group Garderobsutmaningen (the Wardrobe Challenge), where
you are supposed to update your wardrobe by every means possible, except by
buying newly produced clothes, as a means to do both your appearance, your
bank account and the environment a service. Re-purposing fabric, dyeing, embroidering, altering,
swapping, mending and so on is encouraged. As I’ve seen all the other things
people have mended I felt more ashamed than usual about my own unsightly
petticoat hem, and decided that enough was enough. So today I cut of the worn
piece, and made a simple turned hem instead. I chose to do it this way, as it
protects the pinked flounce still there from being torn.
Ready to be worn again, without shame.
So that’s one meaningful thing done today. Be prepared to hear more about this challenge - my wardrobe do need a bit of work. Fun as it is with period and fantasy clothing (I haven't come across anything that can beat it yet), it's also nice to look good when going about ones day to day business...
Monday, 9 February 2015
Friday, 23 January 2015
Sunday, 19 May 2013
The Cinderella Dress
I was a
little girl when I first saw Rodgers and Hammerstein’s Cinderella from 1965,
starring Lesley Ann Warren. I fell in love with it completely and
wholeheartedly, and no other version can so far compete with it in my eyes.
Certainly, the set is a bit too stylized for my taste, and the costumes are not
period – but then, it is a Hollywood interpretation of the Middle Ages from the
60’s, so not much should be expected. Some of the costumes are charming
nonetheless. The cast and characters however are just what I think they should
be: Cinderella is beautiful, meek and scared of confrontation as she should (if
she weren’t she’d not got herself in that serving position to start with); the
Prince has a charming personality, and is so sweet when left by the mysterious
girl; the King and Queen a fine, properly regal couple; Cinderella’s stepfamily
a fun mix of meanness and comical relief. Unfortunately it’s no longer
available on DVD. If it’s ever released again I’ll be one of the first to buy
it.


As you might guess, little B was
coming to me when this picture was taken.
I imagine
more than one little girl wanted Cinderella’s ball gown, and it is beautiful,
though I’d have liked it better with sleeves; it would have fitted in better
with the medieval-ish theme. However, being a bit of a Plain Jane I always
loved Cinderella’s simple work dress better. The same kind of dresses can be
seen on some of the extras. I love how they all have not only blouses, but
whole dresses under those sleeveless ones.


I’ve had an
olive-greenish cotton twill fabric in my stash since I was in my late teens,
and never could quite decide what to make from it. Recently I decided I wanted
a plain Cinderella dress, and this fabric would be perfect for it.

I did not
want to make a reproduction; I just wanted the same feeling, so my dress in
constructed in a different way than the movie costume. The bodice is made from
four panels, based on my old blue Belle dress, and all fitting is in those four
seams, so no darts. I like the clean look it gives. The cotton lining and
fashion fabric are treated as one, and all bodice seams are piped, as are the
neckline, sleeve holes and the waist seam.

It closes in the back with hooks and
eyes. The bodice is hand sewn, as I am not best friends with my sewing machine,
and piping turns out much nicer if I do it by hand.

It took me
a bit of thinking to figure out how to do the skirt. I wanted a ¾ circle skirt,
but I couldn’t fit all three panels and still get the length I wanted. After a
while I realized I could piece the skirt at the hem in the back. Duh. Had this
been a period dress it would have taken no thinking at all to figure that out –
with historic clothing piecing is a matter of cause. Excuse the wrinkles: the picture were taken after wearing the dress for a few hours.

The skirt has pleats at
the waist at the front, back and sides, and sewn in smooth in between, and the
hem is hand stitched. As with the mid 1800’s common dress, I lost weight between cutting out the bodice and
finishing it, so after the dress was done I had to take it in five centimetres,
which is about two inches. I can’t
understand that it was so much too large, as I don’t think I’ve lost that much
weight, but I don’t think the fabric has stretched either. Now it fits well
again; almost too well, just in case I'll loose some more weight.

I really
like this dress style, and will very likely make more. I wore the dress for church today, but worn with tricot tops, or coloured, more sturdy blouses it could easily work for everyday. I have a nice denim-look fabric that could work well....
Wednesday, 31 October 2012
Not Much New
At least
not much new to post about. I’m currently working on my new winter coat, in
delicious wine red wool. The picture does not do it justice at all. If all goes
well it’ll be beautiful. Not sure if I’ll get it finished this winter, though….


I’m also
sewing on my long neglected regency stays, when working on the coat isn’t
doable for some reason. I have the bust gussets sewn in, and am working on all
the cording on the front piece.

I try to
get the last boxes unpacked, and enjoy the candles shining in the evening
darkness. I love autumn.

Little B is
walking around, pushing a chair for support. He understands most of what we say
now, and find enjoyment in the praise he gets when doing what we ask him to.
He’s a delightful, sweet, clever, loving little person, smothering us with very wet
kisses. I’m so happy to be his Mum, and lucky to be a stay at home Mum.

I’m
thrilled that Sewing with Babies is being shared! For the moment I can get a
few stitches done every now and then if I do my sewing standing up (if I sit
down I must be doing something fun, and B will want to be part of it, which is
not always possible), or having him in my lap, and explaining what I’m doing (“the
needle goes down through the fabric, then up, and SWISH goes the thread! Down,
up, SWISH!”).
Tobias and
I are watching the Wartime Farm series, and it’s as delightful as Victorian
Farm and Edwardian Farm was. I want to make a down quilt just like the one Ruth
made.

And that’s
it really. I hope you all have a pleasant autumn, and hopefully I’ll have
something interesting to post about soon.
Monday, 1 October 2012
The Return of the Livkjol
Autumn is
upon us, and warmer clothing is required. As some of you long time readers
might know, I love folk costumes in general, and the ones from my place of
birth in particular. Now, I like when you can take an element from period
clothing and bring it into ones 21st century wardrobe. I decided to
try and see if a livkjol can work
today. The livkjol is the main piece
of clothing for many country women in Sweden up till the mid 19th
century, even longer in some places. It varied a lot in appearance depending on
where you lived, always consisting of a bodice with an attached skirt (liv = bodice, kjol = skirt). In the spirit of true local patriotism, I chose to
base mine of off the ones close to home. Well, where I lived as a child anyway.
Now, I
wanted a dress that would not be a costume, or a period correct piece of
clothing, but a garment that could work today, inspired by a period (and very local) style. Not modern by any
means, but not too odd. Silk were out of the question (I have a baby after all),
as were too bright colours. I also had to use what was already in my stash. I ended
up making a dark brown bodice, trimmed with black strips, and a dark green
skirt, all in wool blends.


Occupational hazard?
In that
part of the country, the west of Skåne (Scania),
the bodice and skirt of the livkjol
were made from different fabrics, the skirt usually wool, the quality depending
on wealth and occasion. The bodices were wool for everyday, and might be for
nicer clothes as well, but those who could afford it had bodices in silk,
preferably brocade. The bodices on fancier livkjolar
were often trimmed with strips of silk in a solid colour. The bodices were
closed in front by hooks and eyes, or a chain and buckles in silver or a lesser
metal, or simply left open. The skirt was also opened in front, but as most of
it was covered by an apron, it didn’t show. All these variations were often
dependant on where you lived - a few miles might often make changes in cut and
style. You can see a variety of livkjolar from Skåne here.

The bodice
is cut in one, and gets some extra shaping from two darts in the front. Darts
began coming into use in livkjolar in
the mid 19th century, inspired by the current fashion. This picture
shows two young girls from the 1870’s in darted livkjolar over knitted sweaters, spedetröjor. Adorable aren’t they? It closes with hooks and eyes. It's is lined with a simple
cotton fabric, but back in the day, linen would have been far more common.
The shape
of the trim (especially in the back) is typical of some areas in Skåne, and can be seen on the country
woman on the left in this picture, Marknad i Lund (Market in Lund)
from 1858. It’s made of strips cut on the straight grain, shaped around the
curved edges with little stitched down tucks.

The skirt
is flat in front (as is often the case in originals), and then pleated with
double knife pleats, though I think single ones were more common. I didn’t want
a front opening as I won’t wear an apron to cover it, so I made some sort of
version of a dogleg closure. While the bodice opens at centre front, the skirt
opens under the first pleat to the left, almost invisible. It has a facing in
mud coloured cotton at the hem. The skirt is a bit shorter than originals, but
I think it works for modern wear.

The
greatest deviation I’ll be making is in what I’ll be wearing with the livkjol. It would have been worn over
white linen shifts and dark knitted spedetröjor,
but I’ll wear it with a bit more modern (mostly store bought) blouses, shirts
and sweaters. I did end up having to make the blouse I’m wearing in the
pictures, when I remembered that all my pre-pregnancy ones are too small, and
will be as long as I nurse. I really tried to sew it using modern techniques,
but I have forgotten many of them, and automatically start using period ones….

Occupational hazard?
Monday, 27 August 2012
Nalbound Winter Bonnet
Sometimes
this blog is quiet for weeks on end, and then there are two posts in as many
days….
I generally
like having something on my head (which in many living history situations is
lucky), but there is one thing I’ve never found neither comfortable nor
attractive on me; the common knitted winter cap. I think they mess up the hair
something terrible (I have very fine, silky hair, which is especially
unmanageable during the winter), and, since I wear my hair up most of the time,
it looks plain ridiculous with a modern cap over it. I had planned to make a winter
cap of my own for years, with my usual hairstyles taken into consideration, but
never got round to it. But now, over the past month or so, I have made one! I
finished it last week, it’s been the project I’ve been working on while putting
B to bed.

It’s
nalbound from the same wool yarn as Tobias’ socks, no idea what the stitch is
called. I had an idea to make it in a shape similar to that of a Regency bonnet,
as they were made to fit over hair worn in buns, and frame the face nicely. Not
sure how well I did on the bonnet shape, but I’m pretty pleased all the same.

The bonnet
has nalbound scallops round the edges, and is further decorated with embroidery
in wool yarn, resembling a fantasy version of fir and berries. A little on the
Mrs. Santa side perhaps, but I like it.

The bonnet
can also be worn with the brim turned back; I’m not altogether certain which
look I prefer yet.

What do you think?
Sunday, 26 August 2012
A Nursing Friendly Dress
In my last
post I wrote about some pillow cases I’d finished as part of my “forbidden to
start any new projects until we’ve moved” deal with Tobias. Another thing that was
awaiting completion was a dress begun this past spring. I wanted a pretty
dress, fit for church, which it would be possible for me to nurse in, without
it being too obvious it was a nursing dress. If I could still wear it after B
is weaned that would be nice. I had seen a very pretty dress worn by Sophia
Myles in an episode of Foyle’s War some years ago, and was reminded by it when
I bought the first three series. I decided to try and make something similar.

I had
stumbled on very good priced semi sheer cotton during the winter, and decided
it would do for this project. I draped the bodice, sewed it, and left it. Now I
took it out again, drafted the skirt and sleeves, and rather quickly finished
it. I also made a rose from the dress fabric and a piece of velvet ribbon to
wear in my hair.

The dress
is closed by a zipper in the left side, but the gathered bodice front opens, as
you see, with self fabric ties. This makes it quite easy to gain access for
nursing, and also makes it a bit adjustable in size for when I’m no longer
nursing.

The dress has wider ties that make a bow at the waist back, to give
some visual interest. The skirt is slightly flared, and ends mid calf.

The sleeves
are gathered at the shoulder, and have six small, stitched down tucks taking in
the width at the cuff.

This dress
turned out entirely hand stitched, first since I did a lot of sewing when B was
sleeping in my lap as a teensy weensy baby, and then, when I took it out again,
my sewing machine was not easily accessible in the mess and confusion of boxes.
Unfortunately
I’ve had to use the self timer on the camera, and after wearing the dress for hours, so the pictures aren’t all too
good. Also, I’m afraid the nursing bras I have don’t give enough support to
make a pretty silhouette. Ah well, I’ll have to live with that until I make one
myself, or stop nursing.
Subscribe to:
Posts (Atom)