Showing posts with label empire. Show all posts

Wednesday, 14 September 2016

A Plain Empire Petticoat

I’ve been meaning to make an early 19th century petticoat for some time, and now I finally have! It’s a plain, unadorned petticoat held up with shoulder straps, simple but serviceable. I mean to primarily wear it with my heavily pieced lower class dress.

Now, it took some courage for me to post this picture, 
as my heavy upper arms are a sore spot with me. Be kind.

The petticoat is made from bleached linen, a bit on the coarse side, and a bit too loosely woven to be perfectly period, but it’s what I had in my stash. I didn’t have very much of it, so the petticoat ended up slightly shorter than I’d have wished, but still within what’s acceptable for the period, and it does the job. I made it with the measure and cut method, as it’s so simple it doesn’t require an actual pattern. The front is cut as a shaped panel to fit the raised waist from side to side and widens towards the hem.


The back is cut in two straight panels with a seam down the back. It would have been more period to have the back cut in one, with a slit cut in the fabric for the back opening, but I had to piece the back to make it wide enough. 


I used the books Kvinnligt Mode Under Två Sekel by Britta Hammar and Pernilla Rasmussen and Skräddaren, Sömmerskan och Modet by Pernilla Rasmussen to decide what stitches to use, as they describe several Swedish extant garments and seam methods in great detail. The skirt is stitched together with running stitches and a back stitch every inch or so. The seam allowances are folded over and stitched to the joining seam, as seen in several extant dresses in these books. As I didn’t want to lose any more skirt length than necessary, I decided to use the selvedge of the fabric for this. The selvedge sticks out a little bit, compensating for the narrow hem I had to fold back, and hemstitched to it. The selvedge is then folded down on the inside and hemstitched in place. It gives a very neat look, almost like a woven tape being used. There are examples of cut off selvedges being used to hem skirts among the lower sorts on the Swedish countryside though, so it’s not completely taken from my own head.


I folded the upper part of the skirt down about a centimetre, and made two rows of gathering stitches in the back. I then pinned the skirt to a waistband (a straight piece of linen folded in half), putting a pleat in each side to give room for the hips, and drawing up the gathering threads to make shallow cartridge pleats. Skirt and waistband where then whip stitched together. I finished the waistband with running stitches along the upper edge. The waistband is almost on the wide side, but that was a conscious choice to add that extra little bit of length.

 
For shoulder straps I cut two straight pieces of linen, folded them in half and sewed a row of running stitches along each side. I pinned them in place, tried the petticoat over the proper underpinnings, and adjusted them until I was happy with the fit. After taking it off, I made sure both sides matched, and stitched the shoulder straps to the inside of the waistband.


For closure I decided on ties. I had cotton tape at home, so that is what I used. Silly enough, the waistband turned out too large (the result of me being lazy and not putting on the stays before measuring for it), and I didn’t feel like unpicking it, so I made an eyelet for one of the ties to go through, and I can let the ties wrap around to tie in front instead, making the petticoat adjustable in size. A dress in Costume in Detail by Nancy Bradfield has that feature, so I decided it was acceptable.


In the pictures I have tied the tapes under the petticoat, but if I put the tape through the eyelet from the inside and out I could tie the tapes on the outside instead. 
I'm wearing the petticoat over a linen shift and 1810's style stays.


So, while it’s no fancy sewing, at least it’s historical. I’m back, people!

Friday, 4 December 2015

A Working Class Empire Dress

Before last week, I’d never made an Empire/Regency dress. Imagine that. I love the period, but for some reason I felt intimidated by them, which is funny, as I’ve made lots of far more advanced and complicated things. Mind, I have made a shortgown, which is basically the same thing, only, well, shorter. But I’m rambling.

Picture by Pernilla Leijonhufvud

Recently I was invited to attend a small event at a local museum, and though I could have whipped up a petticoat to use with said shortgown, I really wanted a dress. I had a cotton fabric with an almost handwoven look to it that I wanted to use. That would work well, as I wanted to portray the housekeeper of the middle class house we were to be in. The stripes reminded me of the ones in ordinary Swedish women's extant dresses from the period. They were quite often made from linen/wool, but cotton is also represented.

Just two problems: the fabric only measured 150x210 cm, and I only had one week in which to make the dress. That’s one week where cutting, fitting and sewing had to be completed around all the things stay at home parents of little children do.


I used the pattern I drafted for the shortgown as a starting point, but changed it into a drop front. And then it was the cutting. I only had two rather short skirt lengths of fabric, and both bodice and sleeves had to come from the two pieces on either side of the shaped front skirt panel. As it is cold this time of year, I wanted long sleeves, or things would have been much easier. This is indeed a little sister of The Insanely Pieced Dress I made a few years ago:

The bodice back is made from two pieces, picture of that further down. The bodice fronts are made from 4 pieces each:


 The bodice “bib” is made from three pieces:

 
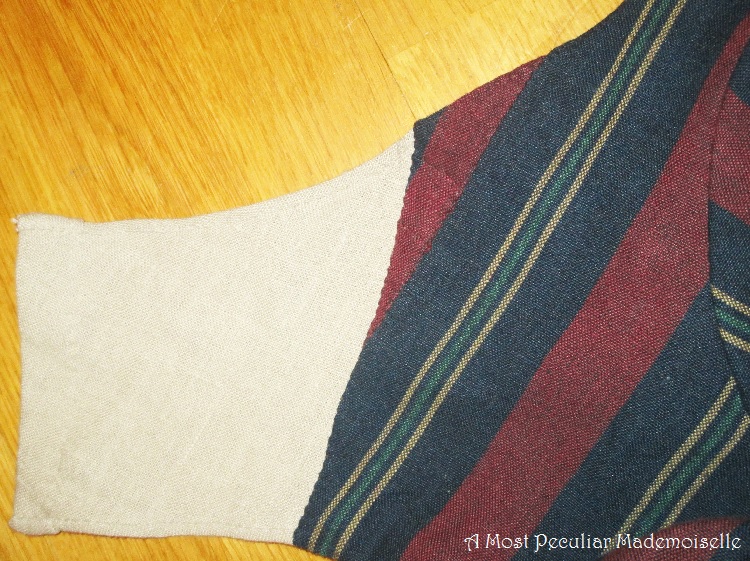
The sleeves are made from 4 and 6 pieces respectively, not counting the bias strips at the wrists:


In the end these are all the scraps that were left:


Naturally I hand sewed the dress, using waxed linen thread (unbleached where it wouldn’t show, and brown for the rest) and period stitches. I lined the bodice and sleeves of the dress with unbleached linen. I might not have lined the sleeves had not all that piecing in them needed some protection from wear. 

I did my best to make the direction of the stripes follow the bodice as seen in extant dresses, and am rather happy with how it came out. 


The bib is pinned in place with reproduction brass pins. I put a pleat near each end of the bib to make it shape itself around the bust nicely. I still haven’t decided if I’ll stitch them down to make darts or leave them as they are.


The sleeves are pleated at the back of the shoulders, and are full enough at the wrists to pull on without any closures. A tuck at the elbow (seen above in the picture of the piecing) provide a little extra room for movement. The bias strips are decorative, but their primary function is adding well needed length. The sleeves are still slightly too short, but they will do.


The skirt is smooth in front, and the ties on the front part of the skirt runs through stitched bars by the back seams, and then ties in front, under the skirt.


The skirt is cartridge pleated in the back. A small pad prevents the skirt falling in at the small of my back, and also supports the ties of the skirt front and any apron that might be worn. I added tapes to the inside of the bodice back to tie in the front, as I didn’t think the bodice lining did a good enough job to keep the bodice back tight to the body. The fine white cotton ties are too fine for this kind of dress – it was still a rather fancy material here in Sweden – but it’s what I had at hand. At least they won’t show. 


I faced the skirt hem with a cotton/linen tape I wove a couple of years ago – facings are brilliant when you don’t really have any skirt length to sacrifice on hems, and it’s a period way to finish them. The tape too is pieced – it was initially used as 18th century style ties in a hobbit skirt, and are in four pieces.

 
In the end I managed to get the dress wearable in time for the event, if not completely finished, hence the mitts in some of the pictures - the sleeves were not yet hemmed. Now however, it’s all done!

 Picture by Pernilla Leijonhufvud

I really like how it came out, and enjoy wearing it. Now I'm really keen to make more Empire dresses. The pictures with the mitts are from the event at the museum, the ones without were taken today, when the weather finally allowed me to document the finished dress.

I haven’t had time to participate in the HSM for a while, but this dress fit the last challenge of the year.

The Challenge: # Re-Do

What Challange/s are you re-doing?: # 2 Blue (the dress has a lot of blue in it), # 3 Stashbusting (everything came from my stash), # 5 Practicality (it is very much a dress to work in), #6 Out of Your Comfort Zone (first time making a dress of this period), # 10 Sewing Secrets (lots of almost invisible piecing).

Fabric: Rather heavy weight, plain weave cotton and linen.

Pattern: My own.

Year: 1810’s.

Notions: Two kinds of linen thread, three kinds of cotton or cotton/linen tape, cotton batting.

How historically accurate is it? Pretty much. Materials, pattern and sewing is rather good.

Hours to complete: Difficult to say… estimated somewhere between 25-30 – the piecing took quite a bit of time to get nice.

First worn: For a small museum event last Saturday.

Total cost: Nothing at this time, as everything came from my stash. The main fabric and the brown linen sewing thread were originally a gift, the linen fabric was left over from a previous project, and two of the tapes were recycled from other clothes.

Sunday, 21 June 2015

The Importance of Stays

I've been meaning to take pictures of the early 19th century shortgown I made last year, to show how it looks on me when I'm not six months pregnant, and now I finally have. Actually, it turned into a comparison between early 19th century clothes when worn over different underpinnings. Now this is far from a conclusive comparison: there where many different types of stays, and for all I know less affluent women in some places might actually have used the overlapping bodice lining as only support (these linings are found in simple country women's dresses and spencers in Sweden as well, but no other supportive garments suitable for that class have survived as far as I know) - it works well enough, though not giving a very elegant silhouette. Each kind of supportive garment will give different results. However limited this comparison may be, it will still give a hint as to how very important the right underpinnings are for the impression you wish to give, and what year you wish to represent.


I used my corded, lightly boned stays with a wooden busk in front. The figure you get with these stays - even someone like me, a somewhat overweight mother of two - is one with a very high waist, bust pushed to the sides, and narrow ribcage. This was fashionable in the early 19th century, especially in the 1810's. The stays helps with posture, and prevents your outfit looking too much like maternity wear

 Walking Dress for mourning, Ackerman's Repository, December 1817

With the bodice lining you get a decent lift and support, but of the mono bosom kind. It will pull the dress forward a bit if the bust is heavy. It will not help with posture, and won't hide any fluff you might have. This general look is seen in the very early 1800's (though I should think most women of fashion would wear some more substantial support), and might have remained among the lower classes for a bit longer, especially in places where stays were not common among ordinary women.


I myself would not wear the clothes of a middle- or upper class woman without some kind of proper stays under them. For some (Swedish) working class impressions though, using the bodice lining for support just might be adequate.

Friday, 21 February 2014

Early 19th Century Shortgown

At pretty much the last minute I decided I wanted to make something for the third HSF 2014 challenge. The theme was pink, and I had a piece (160x110 cm) of pink cotton print in my stash that screamed it wanted to be an early 19th century shortgown. It’s what I bought it for in the first place, but I got a bit hesitant when it was time to cut – was the print period enough? I posted the question at the HSF facebookpage, and enough knowledgeable people said it was close enough for me to feel it ok to use. I did a bit of research on shortgowns to decide what style I wanted. I was limited by the amount of fabric I had and the fact that I’m rather bigger than I usually am, and will grow larger before I shrink again. It had to fit a range of sizes, and I also wanted it to be breastfeeding friendly. 


In the end I decided on a fitted back and a flexible, drawstring front. I had wanted fuller and longer sleeves, and a longer skirt, but even with piecing this is all I got out of it – I didn’t feel quite as ambitious when it came to piecing as I did last year with the mid 19th century dress. Still, I think it looks rather nice.

I was going for a lower middle class everyday look, the kind of clothes you might wear while cooking, tending to the children, sorting laundry before sending it of and such, so nothing too fancy. 


I drafted and adjusted the pattern myself, and the shortgown is entirely hand sewn with period stitches. Linen thread is used, unbleached for the inside, brown for visible stitching. There are a few pleats at the front to allow extra fullness over the bust without adding bulk to the skirt.


The bodice is lined in the back with plain cotton, and has a loose lining in front which closes by pins.


The sleeves have cuffs that closes with sewn loops and self fabric covered plastic buttons – not period but it’s what I had at home and it will never show. I covered the buttons like this, as described in “Kvinnligt Mode under Två Sekel” (Female Fashion during Two Centuries) by Britta Hammar and Pernilla Rasmussen. All the stitching was also taken from their descriptions of extant clothing.  

 Wrap the button in fabric.

Cut off excess, but leave a shank.

Stitch to sleeve.


Wrap the thread around a few times and secure. Make the loop for closing.

Flounces, that is seen in many extant garments from this time, finish the sleeves. This kind of sleeve treatment, with the closed flounce and an opening just by the cuff, is seen in two extant dresses at Kulturen in Lund, Sweden. The sleeves have short, less full under sleeves from the lining fabric.


The skirt is sewn smoothly at the front and sides, and is cartridge pleated to the back, as most extant lower class dresses in Sweden. Unfortunately there are no surviving shortgowns here that I know of. 

 
All in all I’m pleased with how it turned out (though it makes me look huge at the moment [EDIT: pictures of it when I'm not pregnant]), but next time I will make the armholes even deeper in the back, push back the shoulder seem a bit more, and have more material to work with. Also, I intend to wear this over stays, but at the moment mine don’t fit, and who knows if I’ll get the maternity ones finished before they’re of no use… As a result the shortgown doesn’t sit as well as it should at the moment as the pinned lining does all the supporting.


The Challenge: #3 Pink

Fabric: Cotton print, plain cotton for the lining

Pattern: Drafted my own from pictures and patterns taken from extant examples

Year: Ca. 1810 

Notions: Linen thread, cotton tape, plastic (!) buttons

How historically accurate is it? Pretty much; it’s constructed like period examples, hand stitched with period stitches, using period correct materials for the most part. 

Hours to complete: Not sure… for such a simple garment it took quite a bit of time: I was quite sick of it in the end. I’ve worked on it between two and four hours most days during the past week, but then I’ve also had “help” from my toddler most of that time. 

First worn: For the pictures

Total cost: Nothing at this time, everything came from my stash.

Thursday, 7 February 2013

Regency Shift

I decided to make a Regency shift for the third challenge of the Historical Sew Fortnightly – I have the stays, I really should have a shift. 

Ehm... I'm not pregnant, the linen is just very crisp...
 
I cut the fabric out on Monday evening last week, and by lunch today, it was finished. It doesn’t show in the picture, but the shift ends just below the knees; I’d like my next shift to be a bit longer, but I tried to save as much fabric as possible, as I have plans for what’s left of it.

 
The shift is made from two squares, two gores (each made from two halves, to make the best use of the fabric), and three rectangles. They are sewn together using running stitches and a back stitch every few stitches. The seams are felled and stitched down to one side. 


A drawstring made from thick, braided linen thread is encased in the hem of the neckline, tying on the inside front.


The Challenge: #3 Under it All
Fabric: Fine, crisp, bleached linen.
Pattern: None: I used square construction made to my measurements.
Year: Early 19th century.
Notions: Medium thick cotton thread for sewing, thick linen thread, braided to make the drawstring.
How historically accurate is it? Pretty much: the construction is period, as is the material. It’s all hand sewn, with felled seams. The braided drawstring is not ideal perhaps, but plausible.
Hours to complete: Not sure…. A couple of hours a night, so maybe 15-20 hours?
First worn: For the pictures.
Total cost: None at this time, as I had all materials in my stash. I don’t remember what I originally paid for them.

So far I’ve only made underwear for the Historical Sew Fortnightly, but that will change: the item I'll make for the next challenge will be seen when fully dressed.

Thursday, 17 January 2013

Regency Stays Finished

My Regency stays are done! It took a while, I’ve been working on them on and off (mostly off) since 2010, but as of this afternoon, they are finished. 

Finished stays! Excuse the 18th century shift.

I had hoped to get them done in time for the Historic Sew Fortnightly’s first project deadline, but that didn’t happen. The last days of sewing didn’t go very smoothly at all. First, after being laced up by Tobias for fitting, I noticed that the bust gussets were way too small. It looked beyond ridiculous. I decided this mishap must be due to me not taking my new, post baby figure into account, but went along with what I had cut out before pregnancy. 

Not the most neatly laced stays; uneven and unlaced
 the last few inches at the bottom. The lacing cord snapped...

The stays were also a bit small in the hip area, and wouldn’t lace even with the rest. That could have been solved easily enough, if I had chosen to, with gussets in the side seams. As the originals didn’t have hip gussets, in the end, I redid the side seams, taking a little away at the top instead. 

The stays laid flat. The drawstring in the upper binding is seen.

They are still not perfect (they are still a bit uneven, but this time it’s partly because I had to hurry as baby was waking up, and partly because the cotton tape I used for lacing snapped, and I just couldn’t bother to do it all up again. I tied it up and left it at that, so the stays aren’t laced all the way…), but as I’m not usually doing regency (not yet anyway), I’m not going to use these stays very often at all, but made them as a sort of trial run. If I start using regency clothes (or empire, as it’s called here) more, I’ll make a new pair, which will hopefully be better. 

The shoulder straps ties in front.

But oh, the bust gussets! They needed instant replacing. When most of that was done, I woke up last Saturday morning with blocked milk ducts. It’s the second time I’ve had it, and apart from hurting, giving me a touch of fever, and generally making me feel under the weather, it also felt stupid. To get plugged ducts after nursing for thirteen months! Needless to say, I hardly got anything done. Apart from not feeling up to doing much, one doesn’t want to put ones poor bosom in an unfamiliar position with possible pressure (as Regency stays unavoidably does) for fittings, when having (or just suffered through) blocked milk ducts. So I fell behind schedule. 
 
The busk is inserted in the channel from the bottom, 
and is kept in place with cotton tape.

Anyway, now they’re done. They are pretty comfortable, and give a good imitation of that typical "two globes on a (rather curvy) pillar"-look fashionable at the time. That curvyness would not have been in fashion, and stays would have been made to smooth the figure as much as possible. Because of the curviness, and since there are so few bones, they pucker a bit at the sides over the hips. Not pretty, but won't show under a petticoat and dress. I have an hourglass figure, however, and that is difficult to spirit away... Another thing that annoys me is the shoulder straps slipping down. Not sure what to do about it, I already angled them up toward the shoulders a bit. Well, for you doing the HSF here is the info on them:

The Challenge: #1: Bi/Tri/Quadri/Quin/Sex/Septi/Octo/Nona/Centennial. Sew something from __13, whether it be 1913, 1613, or 13BC
Fabric: An old cotton sheet for the outer layer, and tan cotton twill for the lining.
Pattern: Based on a small scale pattern taken of an extant example in a Swedish museum, found in the book “Underkläder – en kulturhistoria”, by Britta Hammar and Pernilla Rasmussen. There are also good photos of both the front and the back of the stays in the book, so I’ve been able too cord mine pretty similarly to the original. 
Year: The stays are dated to the 1810’s, and would work tolerably well in 1813.
Notions: Cotton tape for the binding and lacing, cable ties for some boning, artificial whalebone for the long bones in the back, thick cotton string for the cording. Cotton thread.
How historically accurate is it? The material is not ideal; the top layer should have been cotton satin, like the original, and the thread ought to have been silk, not cotton. The tape used for binding should have been whalebone twill, but mine are plain tabby. But with limited means I had too use what could be found in my stash. At least all of the materials (except for the plastic boning…) would have been available at the time. The sewing, however, is of course all done by hand, using the same kind of stitches as in the original. I waxed the thread for strength and durability. All cording and boning are located in the same places as on the original, and the cording “pattern” followed closely, if not exactly. I did add extra boning and cording to the centre back though. So all in all, I think they’re pretty accurate.
Hours to complete: No idea, I’ve been working on these on and off (mostly off) since 2010.
First worn: Only for the pictures. 
Total cost: Nothing at this time, as all materials came from my stash.

The cording, boning and busk channel on the front piece.

And now I must hurry if I want to finish challenge # 2 in time.

Tuesday, 8 January 2013

Regency Stays – Stitching Together the Front and Back


I’m finished with the cording of my Regency stays, and have sewn one of the back pieces to the front. I use the method used on the original I base mine on. It’s done like this:

Fold the seam allowances of the outer fabric and the lining so they are between the layers of fabrics. Put the front and back together right side to right side and stitch through the two double layers of outer fabric and the double layers of the lining.


And back through the outer layers of fabrics and the lining.


The seam will end up looking slightly wavy, and is pretty sturdy, so it will be almost like a light boning.


Unfortunately the temporary stitching I made for fitting purposes has left horrid marks on the outer fabric. Hopefully they’ll go away in time.


This kind of seam was used in bodices during the 18th century, and is rather nice to use. One seam and you get a neat result, both on the outside and inside.

I’ll try to get the stays finished for the first of the Dreamstress’ Historical Sew Fortnightly challenges, but only if I can make it without too much stress. I don’t do well under pressure, so though I really like the idea, and would like to do all the challenges, I have to face reality. 


The Historical Sew Fortnightly hosted by thedreamstress.com

Hopefully I’ll get to finish some projects at least.