Showing posts with label upcycling. Show all posts

Saturday, 1 April 2017

Hankasärk II - A Swedish Folk Costume Shift

Some years ago I made a hankasärk, a sleeveless shift from the very South of Sweden, to wear with my folk costume. Now I’m working on a Ca 1810 everyday version of that folk costume for an event I hope to attend in a few weeks, and need a new hankasärk. The old one is a bit too loosely woven for my taste, and a smidge tight. In the beginning of March I made a new one, but I never got round to blogging about it until now.


I had the cover of an old mattress, probably used in the early/mid 20th century in a military or hospital setting. It was made from a very sturdy, handwoven linen, and though it was stained here and there and had a few unsightly mends, I thought I could get a hankasärk from it. The densely woven fabric, with nice selvedges, was too good to pass up.


I had a 1:10 scale pattern, taken from an extant hankasärk, that I used as a guide when making my first one, so I knew what the pattern pieces should look like, and I looked at pictures of extant hankasärkar to see what similarities and variations there were. I then decided on the measurements for mine, measured on the fabric, and cut to a thread. All the pieces are rectangles of various sizes: one for the front and back (there are no shoulder seams), one in each side, two narrow ones to form the waistband, and four to make up the skirt. In the originals there are usually three skirt panels, but my fabric was a bit narrower than the ones originally used, so I chose to use four to get a similar width in the finished garment.


The bodice part is made up with back stitches, with all seams neatly felled to one side. I then hemmed the sides, that would be arm openings. After doing this I discovered that I’d sewn one side inside out – oops. Several friends advised me to let it be; similar mistakes are seen in extant shifts. I pondered what to do while working on the skirt part, and then unpicked the armhole hem that was inside out, and stitched it again, to the right side this time. I left the side seams be though: they were discreet enough not to bug me. All seams and hems were made as narrow as the fabric would allow.


The skirt panels had neat selvedges, so to make maximum use of the width, I whip stitched them together. This made almost completely flat seams when pressed. As I have upcycled the material, there are holes from the previous seams, but hopefully they’ll mostly go away in the wash. 


The skirt is attached to the waistband with stroked gathers. They turned out a bit less tight than I’d wanted (I might be  bit wider than the original wearers, or I didn't do the gathers fine enough), but it’s acceptable. 


The waistband and bodice (with all edges, including the bottom, hemmed) were then joined by whip stitching.


I managed to avoid the worst stains when cutting out the hankasärk, but there are still a few fainter ones. I decided not to let them bother me though. There were also the few holes that had been mended by machine. Though reasonably well done, machine mending on a shift I intend to be from well before a proper sewing machine was invented just wouldn’t do. I unpicked the mending, and redid it by mending a larger hole with a patch, and two smaller ones by sewing/weaving linen thread over them. These flaws make the shift look well worn and cared for, something I don’t mind at all. There’s no fun in looking all sparkling new, like you wore a fancy costume instead of proper clothes, especially not in a lower class living history setting.


For all sewing I used linen thread that I strengthened with bees wax. For the monogram – common in large households in a time were all linens looked more or less the same – I used cotton embroidery floss. Most people in early 19th century Sweden used patronymic surnames, so the first letter stood for the person’s first name, the second for their father’s first name, and the third for son/daughter. It’s a practice still used in folk costumes. You can also see the seam that ended up wrong side out.


This will be my first entry in this years’ Historical Sew Monthly. It could have fit under February’s 'Re-Make, Re-Use, Re-Fashion'but obviously it was too late for that, so instead I’ll put it under April’s ’Circles, Squares and Rectangles’.

The Challenge: #4 Circles, Squares and Rectangles.

Material: Handwoven linen.

Pattern: Based off of period examples.

Year: Ca 1800-1850.

Notions: Linen thread, bee's wax, cotton floss.

How historically accurate is it? Pretty close in both material,construction and sewing.

Hours to complete: No idea.

First worn: Hopefully at an event in a few weeks.

Total cost: About 50 SEK (5,25 Euro, £4,49, $5,6), not counting the work.

Friday, 13 January 2017

The Red Riding Hood Winter Coat

Way back in 2009 I picked up a piece of cheery wine red wool at a good price in a fabric shop that was closing. I wanted to make a winter coat from it, but there wasn’t enough for what I had in mind. Soon afterwards I stumbled on a piece of wool in the same quality, but a shade or two darker, in a charity shop, at an even better price. This could work, and I quickly cut out some of the pieces for it. And then life happened. And happened again, and again. I would pick it up, do some work on it, and then it would creep back into the UFO pile.


When I got it out this summer, seven years and two children later, it didn’t fit very well. I had to do some hard thinking, and then, with the help of piecing and added panels, will it to do as I wanted it to. In the end, the finished result turned out all right, if not perfect. The style had changed a little since I cut out the first pieces, but overall for the better, I think. The coat itself is made from the lighter red wool, which also lines the hood and pelerine collar made from the darker red wool – the winters here are mostly wet and windy, and the cold goes straight through you. Extra layers of wool are a good thing. 
The coat is also piped here and there in the darker red wool. In the pictures, the contrast between the lighter and darker fabrics show best in the hood.


For the construction of the hood I took my inspiration from 18th century hoods, with the pleats radiating out in the back. Since mine was made from double layers of thick wool, the centre of the pleats wouldn’t quite close, so I covered a button in a scrap of wool and stitched it over the hole.


When it was time to line the pelerine collar, I didn’t have any piece of fabric large enough, so I ended up piecing it together from twelve smaller scraps. The facings in the front is also pieced together from four pieces each, and both the sleeves and the lining of the hood ended up being pieced from two pieces each. I wanted a long row of buttons down the front, and luckily I’d salvaged a dozen buttons from an old, worn-out coat I’d made, which would do quite well. I put two of them in the back, and the remaining ten down the front. Even the lining was reused from something else. All in all, the coat looks nice, maybe even expensive, but it’s all clever scrimping and recycling. Elegant economy, as they say in Cranford.


One morning about a week ago it was snowing, and of course I’d have to take the opportunity to get pictures of the coat. After all, a backdrop of snow is much prettier than a backdrop of mud and sad looking, beat down grass.


 Ever had to completely remodel a project after taking it from an extended time in the UFO pile? 

Thursday, 7 April 2016

Monday, 21 March 2016

Cushion Covers for Spring

As spring was approaching I wanted new covers for the sofa cushions. With this in mind I had eyed an old apron that I made many years ago when just starting out making historical clothing, but has since been demoted to the fabric stash for not being period enough. It had a print of green checks on an off-white base, with flecks of beige giving it a "rustic" feeling. It just didn’t cut it as a 19th century apron, but I thought the green would work well for spring cushions. Said and done, I cut down the apron, stitched up the covers, and added three green buttons from stash for closure on each. That sorted the two larger cushions, but I had three smaller ones that needed new covers even more. 


 I raided my stash, and found a piece of cotton blend upholstery fabric that I was given a while back. There seem to have been a problem with the loom the day it was made, as the woven in flowers are rather ugly – I have another piece of that fabric, where the flowers look as they should, but I have other plans for that. I don’t mind; in this age of wastefulness it feels good to put all fabrics to use, even the imperfect ones. The colour worked well with the green check, picking up the off-white and beige.
 

  I made the covers with a deep overlapping in the back so they would look nice even without additional closure, as I didn’t feel like making more buttonholes. As I only had just enough fabric for the covers without the deep hems I wanted, I faced the openings with strips of beige check cotton fabric left over from lining the bodice of my insanely pieced dress a few years ago. Though it doesn’t really show, a detail like this makes me glad.


 The fabric had a few heavy dark stains that wouldn’t go away in the wash, and I didn’t have enough material to cut around them. As a solution I made a self-fabric appliqué flower with an orphan button from stash as the centre. The placement is a bit odd, but it’s way better than the stains.


 So now our old sofa looks pleasantly light, airy and ready for spring, just in time for Easter. 


The beige theme continues, as I'm working on a checked white and sand coloured 1920-23-ish house dress. More on that later :)

Thursday, 10 March 2016

A Collection of Muggle Money

I was going through some boxes of stuff, putting some of the contents away, donating what could be liked by others, and tossing out the rubbish, when I came across some foreign coins that have been picked up when abroad. Not that my travels are extensive, but I’ve been to Scotland, and unsurprisingly all of the Nordic countries but Iceland. When looking over them I wondered what on Earth I should do with them – there was so little of every currency that exchanging them would cost more than the value of the money themselves, and we’re not likely to go abroad for a while. And then, while looking at the British coins and remembering how fascinated Ron Weasley was with the shape of the fifty pence, it hit me – why not make a small framed collection of Muggle money!

  
Said and done. I took out an open frame I’ve been meaning to give a makeover (it was a white shabby-chic thing), and painted it black. I covered a piece of thin cardboard taken from a corn flakes carton with a scrap of green velvet from my stash, and embroidered “Muggle Money” on it, through the cardboard and everything for stability. 


Then I played with the coins until they made a nice composition, and glued them into place. I finished with gluing the velvet covered cardboard to the back of the frame (not using too much glue, in case I want to give it another makeover in future), and that was that. 


It will make a nice addition to the decorations of my now annual Harry Potter Halloween party. I'm sure Arthur Weasley would approve.

Saturday, 19 December 2015

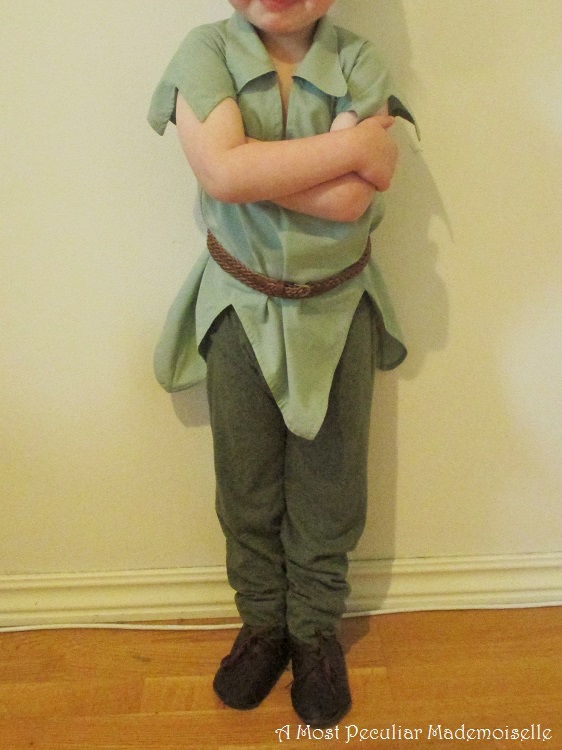
A Peter Pan Costume

My Eldest just turned four. Before I had children I never really considered how important birthdays are to the parents, but now I couldn’t help but reflect on what have happened these four years, how sweet and adorable he was as a baby and toddler, and what a special little person he is today. I wonder what kind of man he will grow up to be, and hope I can guide and inspire him to always strive to be his best self.

Last week he had his first ever birthday party for others than family members, and a handful of children were invited. Having seen it on Peppa Pig (a huge favourite with both boys at the moment), he wanted a fancy dress party. He wished to dress as Peter Pan, and who am I to refuse a request on a costume?


I wanted to work from my stash, but had very little green fabric there. After considering for a bit I realised I had a green worn out knit top that had seen a lot of wear the past four years, as it provided easy access for breastfeeding babies.


I cut off the sleeves and turned them into trouser legs, with a gusset between them. In the end they reminded me a little of the Thorsbjerg trousers, but without feet. 

 
They are held up by an elastic at the waist.


For the tunic and cap I recycled an old cotton blend half circle skirt. The whole outfit was made with the measure-and-cut method, using one of Eldest’s t-shirts as a cutting guide for the tunic. As my sewing machine seem to have given up on life, I had to stitch the cap and tunic by hand, something I've been trying to stop doing, except with historical clothing. 

The cap is self-fabric lined for a bit of body. It has a “feather” made from some polyester-y fabric scraps, remains from when I made cushion covers a few years back. It’s stiffened with a piece of zip tie, and the edges of the two layers of fabric was then molten together over a candle. It makes a much more play friendly and endurable feather than a real one would have been, plus I already had the materials for it. The cap sits so well on the head that my boy can hold his head upside down without it falling off.


The tunic is cut on the bias, with pointed edges on both hem and sleeves. The collar is pretty standard, being made from two layers of fabric, and then top stitched. 


All the edges of the tunic were faced with narrow self-fabric bias tape, and all seam allowances folded in on themselves and neatly whip stitched.


When the costume was finished and it was time to try it on, Eldest said that he needed a belt, like Peter Pan has. I didn’t have one short enough for him, but a thin braided belt wrapped twice around his waist worked well. For the pictures he also wore his medieval shoes – they are already on the small side, he’ll need new ones next year. The costume on the other hand is a bit too large, so he can use it for a long time.


He was really happy with how the costume came out (though pretending to be angry in the above picture), and I couldn’t have been given greater praise than his happy and excited face when he tried it on.

Friday, 18 September 2015

Thursday, 3 September 2015

Fuchsia Dress Makeover

When I was expecting B, I bought a dress. I don’t often buy dresses, preferring to make my own, but once in a while it happens. It has been used a lot since, mostly during my two pregnancies, but on other occasions as well, as it’s very comfortable, and cool in summer. However, it had a few issues. For one it was too short. I don’t wear clothes shorter than below the knees, and, as even skirts of that length show off my stubby legs to disadvantage, I most often wear them a fair bit longer than that. When I’ve been heavily pregnant the dress became almost indecently short in front. As a result, it has always been worn over a longer skirt, like it is here.

 Aren't the mice adorable? I made them for Halloween last year
and liked them so much I just had to leave them out.

Second, the neckline was too low in front, especially when the bust increased a size of five during pregnancy and early nursing. I needed to wear it over a tank top so as not to fall out during those times. (Alas, the difficulty of being "well endowed"; the slightest décolletage will make you look like a wannabe exhibitionist, at least if you're wearing anything more supporting than a nursing bra.) Also, the elastic was too wide, making the neckline warp in a weird way where it curved.


 Third, the sleeves where a bit too short for my liking, for a similar reason as the overall length.

After thinking the dress needed a makeover for the past four years,bu never getting round to it, I finally decided it was time. I found a piece of fabric in my stash, a gift from a friend, which would work well. There was just enough of it to make the changes I wanted.


I unpicked the seams at neck and sleeves, and removed the elastic. I cut the neckline a bit lower at the back and sides, as that was high enough already, but left the front be, as I wanted that raised. In retrospect I could have cut away a bit more at the back and sides. I then stitched a strip of the new fabric to the edge, and inserted narrower elastic. I did the same for the sleeves, except that I did not cut them shorter.


For the skirt I just sewed a strip to the hem. I didn’t have enough material to make it curved like the skirt, so I had to very lightly pleat a straight strip. Not the neatest job I've ever made, but it does the trick. I can now wear the dress as it is, with only a light petticoat under it – the material is quite thin. 

 
 I wish the sleeves were a bit longer though – as it is I still prefer to wear a cardigan with it. 


Yet, all in all I’m pleased with how it turned out. I did all the sewing by machine, a very rare thing for me. As I did, for once, make a New Year’s resolution this year, to become friends with my sewing machine, it felt very nice. I have another dress like this one, in a greyish black, that also need a makeover. I must consider how I want to go about that, as I want a slightly different design than to this one.