
Friday, 18 September 2015

Thursday, 3 September 2015
Fuchsia Dress Makeover
When I was expecting
B, I bought a dress. I don’t often buy dresses, preferring to make my own, but
once in a while it happens. It has been used a lot since, mostly during my two
pregnancies, but on other occasions as well, as it’s very
comfortable, and cool in summer. However, it had a few issues. For one it was too short. I don’t
wear clothes shorter than below the knees, and, as even skirts of that length show off my stubby
legs to disadvantage, I most often wear them a fair bit longer than that. When I’ve
been heavily pregnant the dress became almost indecently short in front. As a result, it
has always been worn over a longer skirt, like it is here.


Aren't the mice adorable? I made them for Halloween last year,
and liked them so much I just had to leave them out.
Second, the neckline
was too low in front, especially when the bust increased a size of five during
pregnancy and early nursing. I needed to wear it over a tank top so as not to fall out during those times. (Alas, the difficulty of being "well endowed"; the slightest décolletage will make you look like a wannabe exhibitionist, at least if you're wearing anything more supporting than a nursing bra.) Also, the
elastic was too wide, making the neckline warp in a weird way where it curved.

Third, the sleeves
where a bit too short for my liking, for a similar reason as the overall length.
After thinking the
dress needed a makeover for the past four years,bu never getting round to it, I finally decided it was time. I found a piece of fabric in my stash, a gift from a friend, which would work
well. There was just enough of it to make the changes I wanted.

I unpicked the seams
at neck and sleeves, and removed the elastic. I cut the neckline a bit lower at
the back and sides, as that was high enough already, but left the front be, as I wanted that raised. In retrospect I could have
cut away a bit more at the back and sides. I then stitched a strip of the new fabric to the edge, and
inserted narrower elastic. I did the same for the sleeves, except that I
did not cut them shorter.

For the skirt I just
sewed a strip to the hem. I didn’t have enough material to make it curved like
the skirt, so I had to very lightly pleat a straight strip. Not the neatest job I've ever made,
but it does the trick. I can now wear the dress as it is, with only a light petticoat
under it – the material is quite thin.

I wish the sleeves
were a bit longer though – as it is I still prefer to wear a cardigan with it.

Yet, all in all I’m pleased
with how it turned out. I did all the sewing by machine, a very rare thing for
me. As I did, for once, make a New Year’s resolution this year, to become friends with my
sewing machine, it felt very nice. I have another dress like this one, in a
greyish black, that also need a makeover. I must consider how I want to go
about that, as I want a slightly different design than to this one.
Sunday, 9 August 2015
Friday, 10 July 2015
14th Century Kirtle Makeover
I’ve been meaning to
give my maroon kirtle a makeover for a long time. I wanted long sleeves, instead
of the short ones. As so often happens, it didn’t get done until just before
the event, when I realised that, due to breastfeeding related reasons, my
yellow kirtle just would not close. Something I'd only wished to do now became absolutely
necessary. I removed
the short sleeves just a few days before the event, cut out new ones, and began
to stitch as fast as I could.

But then I decided I wanted quite a few buttons – the quality and colour of the fabric is really rather nice, so I might as well give it the most fashionable trait of the century.

I made twenty-four small (less than a centimetre in diameter) cloth buttons, a round dozen for each sleeve. Here’s an illustration of the whole progress of button making.


Though I forgot which way she was turned, I still think it ended up rather nice. Thanks to Vix for lending me her distaff and spindle. I'm afraid I made a mess of her work. I'm a decent enough spinner on a beginner's level, but I haven't figured out how to work with the distaff yet.

I
am a bit disappointed that I didn’t get the greyish-blue kyrtil made for hubby,
but sometimes life does not co-operate. I did achieve half the challenge anyway.

But then I decided I wanted quite a few buttons – the quality and colour of the fabric is really rather nice, so I might as well give it the most fashionable trait of the century.

I made twenty-four small (less than a centimetre in diameter) cloth buttons, a round dozen for each sleeve. Here’s an illustration of the whole progress of button making.

When we went to the
event I still had a few button holes left to sew, which I did when only the
one-year-old and myself were awake of all the camp.
I had pictures taken
by Andrea, and as I planned to submit the made over dress to the manuscript challenge, I did my best to imitate the inspiration image. The veil is a bit too long, but it will have to do. In the inspiration image you can't see the front of her dress, nor if there are any buttons on the sleeves. Most likely the dress is one that pulls on over the head, but as you can't tell for sure, I call it good anyway. Same with the sleeves.

Stained glass window of Adam and Eve working.
It was made in the late 14th century,
and was originally from Marienkirche, Frankfurt
an der Oder, Germany,
but after WWII it was taken by the Soviet
Union and is now in the Hermitage Museum in St. Petersburg.
Though I forgot which way she was turned, I still think it ended up rather nice. Thanks to Vix for lending me her distaff and spindle. I'm afraid I made a mess of her work. I'm a decent enough spinner on a beginner's level, but I haven't figured out how to work with the distaff yet.

Wednesday, 8 July 2015
14th Century Child's Shoes
Now I’m back from the medieval
event, and it will be mentioned in a few posts, as I didn’t have time before to
blog about all the things I made for it. If you want to see pictures now, you
can go to my groups Facebook page.
My one year old could use his brother’s old shoes, though being a wee bit too large, but my three year old needed new ones. I have been to this event before, and know the terrain. Though our usual camp spot is grassy and pleasant, you have to walk on both cobblestones and gravel to reach the bathrooms. Also, there’s no knowing what the weather will be like, not to mention the possible danger of sharp objects. So I had to make him shoes.


The Challenge: # 6 - Out of Your Comfort Zone
Total
cost: Not sure how much it would have been if the materials were bought new, but
at this time it didn’t cost me anything, as everything was in my stash.
My one year old could use his brother’s old shoes, though being a wee bit too large, but my three year old needed new ones. I have been to this event before, and know the terrain. Though our usual camp spot is grassy and pleasant, you have to walk on both cobblestones and gravel to reach the bathrooms. Also, there’s no knowing what the weather will be like, not to mention the possible danger of sharp objects. So I had to make him shoes.

His old shoes were boots,
which were secure enough to stay put even on small toddler feet, but now he’s old enough not to kick of his
shoes by accident. I decided to make him a small version of the Bocksten Bog
man’s shoes, dated to the 14th century. It’s a model I’ve made
before, so I had an idea about how the pattern pieces should look. Now, I’m
decidedly not a shoemaker, so if you are proficient at this, brace yourself. If
you have any handy advice, please share. I hope to become a decent shoemaker
sometime in future.
First I traced his
foot on a piece of paper, and then used that to draw a sole. I drew an upper
to. I made a mock-up from them - too small. The second attempt, seen here, worked
well, with minor alterations.

And this was the final pattern.

I used leather I had
at home, 1 millimetre for the uppers, and 2 millimetres for the soles.

I put a
welt between the sole and upper as I sewed, for strength and durability.

I also stitched a
piece of leather to support the back of the shoe. Not puncturing the right side of the leather uppers was tricky, but I only messed up once.

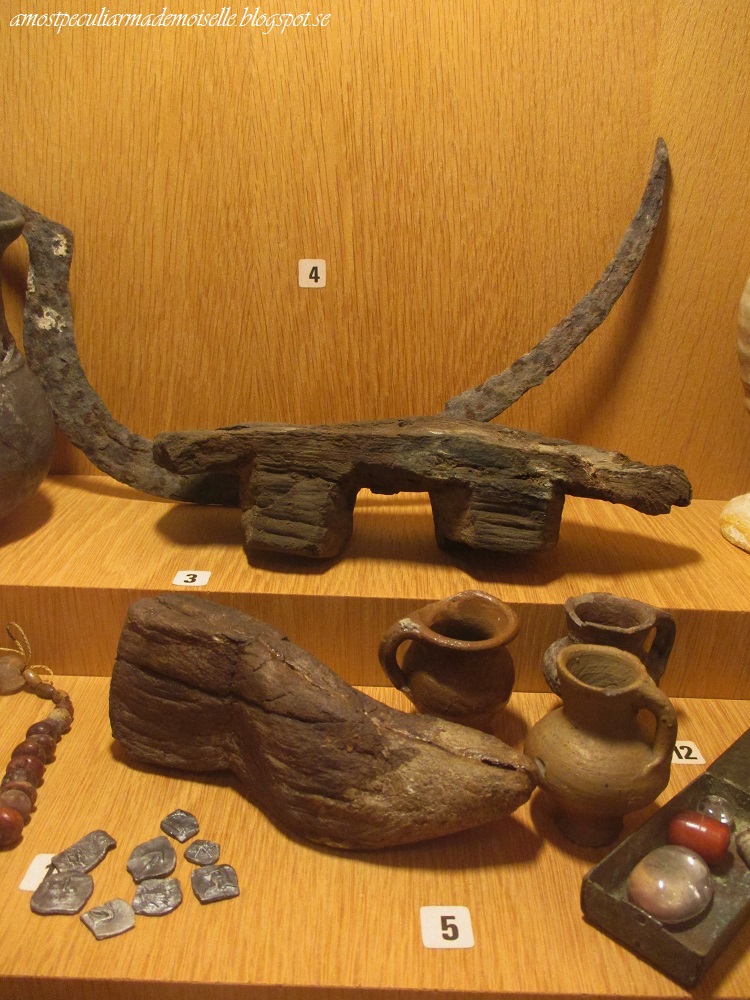
Medieval shoes were really
sewn on a last, like this one (number 5) for a child’s shoe in Malmö Museer, but I’m not
there yet. I’m terrible with woodwork.
I did try one thing to
get closer to historical accuracy though: I did not use needles when sewing. In
period, the waxed linen thread was twisted round a bristle, but as I don’t have
any, I used fishing line instead, as advised by Sofia and Henrik. It took a bit
of practice – at first it wouldn’t work at all, but after more advice and
practice, it worked quite well, and I can see it working excellently with more
practice.
In short, and to my
understanding, this is how it works: you take your linen thread, and unravel the ends a bit, and
pluck at the ends to make them uneven. You wax the thread, and twist it, with its unravelled ends, round the fishing line, which has been
sandpapered for friction. The plucked, uneven ends of the thread makes the
transition from thread to line smooth, and will slide through the holes made by
the awl easy enough. This makes for smaller holes than a doubled thread and
needle would require, and in shoes, this is a good thing.

I believe that to be
more accurate, I should have let the holes in the soles be at an angle, from
inside to the side of the sole, instead of straight trough from inside to
outside, but I decided one new thing was enough for his project, for which I
had some time pressure. I’m keen to try to make angled stitches though, they
make for a much smoother and more elegant result.
After sewing was
finished, I dipped the shoes in water to make them more flexible (of course the
shoes were also wet when I stitched them), and then turned them, letting them
dry with rolled up pieces of terry cloth in them to keep their shape. I then greased
the shoes (which darkened them a lot – rather nice, I think), added laces, and
they were ready to go.

They were finished before the deadline of the HSM
challenge #6 – Out of Your Comfort Zone.
The Challenge: # 6 - Out of Your Comfort Zone
Fabric: 1 millimetre
leather for the uppers, 2 millimetre for the soles.
Pattern: Drafted and
draped my own, based on period shoes.
Year: 14th
century
Notions: Linen thread.
How historically
accurate is it? OK, I suppose – I don’t think it would stand out too much if
sent back in time, though likely seen as the early work of an apprentice. There
are a couple of period techniques that I did not use, and of course that affect
the result. Still, one point to me for giving up sewing with needles!
Hours to complete: Not
sure, possibly about 20.
First worn: At a medieval
event last weekend.
Sunday, 21 June 2015
The Importance of Stays
I've been meaning to take pictures of the early 19th century shortgown I made
last year, to show how it looks on me when I'm not six months pregnant,
and now I finally have. Actually, it turned into a comparison between
early 19th century clothes when worn over different underpinnings. Now
this is far from a conclusive comparison: there where many different types of stays, and for
all I know less affluent women in some places might actually have used
the overlapping
bodice lining as only support (these linings are found in simple country
women's dresses and spencers in Sweden as well, but no other supportive
garments suitable for that class have survived as far as I know) - it
works well enough, though not giving a very elegant silhouette. Each kind of supportive garment will give different results. However
limited this comparison may be, it will still give a hint as to how
very important the right underpinnings are for the impression you wish
to give, and what year you wish to represent.

I used my corded, lightly boned stays with a wooden busk in front. The figure you get with these stays - even someone like me, a somewhat overweight mother of two - is one with a very high waist, bust pushed to the sides, and narrow ribcage. This was fashionable in the early 19th century, especially in the 1810's. The stays helps with posture, and prevents your outfit looking too much like maternity wear

With the bodice lining you get a decent lift and support, but of the mono bosom kind. It will pull the dress forward a bit if the bust is heavy. It will not help with posture, and won't hide any fluff you might have. This general look is seen in the very early 1800's (though I should think most women of fashion would wear some more substantial support), and might have remained among the lower classes for a bit longer, especially in places where stays were not common among ordinary women.

I myself would not wear the clothes of a middle- or upper class woman without some kind of proper stays under them. For some (Swedish) working class impressions though, using the bodice lining for support just might be adequate.

I used my corded, lightly boned stays with a wooden busk in front. The figure you get with these stays - even someone like me, a somewhat overweight mother of two - is one with a very high waist, bust pushed to the sides, and narrow ribcage. This was fashionable in the early 19th century, especially in the 1810's. The stays helps with posture, and prevents your outfit looking too much like maternity wear

Walking Dress for mourning, Ackerman's Repository, December 1817
With the bodice lining you get a decent lift and support, but of the mono bosom kind. It will pull the dress forward a bit if the bust is heavy. It will not help with posture, and won't hide any fluff you might have. This general look is seen in the very early 1800's (though I should think most women of fashion would wear some more substantial support), and might have remained among the lower classes for a bit longer, especially in places where stays were not common among ordinary women.

I myself would not wear the clothes of a middle- or upper class woman without some kind of proper stays under them. For some (Swedish) working class impressions though, using the bodice lining for support just might be adequate.
Wednesday, 10 June 2015
A Child's Green Kyrtle
If all goes well we’ll
be attending a weekend event in a month, and as always, growing kids need new
clothes. B, now tree years old, can wear the blue kyrtle, though it’s a tad too
short for him. But evenings tend to get cold even in the summer, there is always a risk of rain, and our usual
camping place at this event is high up on a frequently windy spot, close to the
sea, so having the possibility to add an additional wool layer is vital. Kyrtles
are much more practical than cloaks for children at play, and as he’ll need a
larger one soon anyway, I made him one from green wool, left over from hubby’shose.


Quite long now, just clearing the ground.
That did not prevent any walking or playing though.
I made the kyrtle wide
and long enough for B to still be able to wear it in both two and three years’ time.
At the moment it just clears the floor, and the sleeves must be folded back
twice, but in a couple of years, the sleeves will fit nicely, and the kyrtle
will reach to about just below the knees, a good length for a boy that will be
wearing men’s clothes, and not those of small children, as he does now.


The whole kyrtle was made from this piece, about 150x75 cm, here seen on the fold.
The kyrtle is
constructed from to main pieces, with two side gores that reach to, and becomes
part of, the shaped armscye. A gore is also set in at centre front and back.
This construction is found in several extant kyrtles called “Nockert type 2”.

The sleeves are so
called S-sleeves, with a gusset set in at the seam at the back of the sleeve.
If need be, I can open up the bottom of the sleeves later and add buttoned
closures.

I needed to piece the
sleeves a bit to get a kyrtle from the material I had, but that is perfectly
period. It does mean that they took a bit more time to make than if made from
one piece, but what you gain in one end you pay for in another.

I lined the top portion
with a soft linen fabric, as I usually do on my young children’s kyrtils, to
prevent any itching or chafing that might happen if the shirt worn underneath
slips a bit. Not perfectly period, but it won’t show, and it’s a cheat I’m
willing to make, as it’s not my children’s hobby - they just tag along.
The kyrtil closes at
the neck with seven self-fabric buttons and buttonholes.

I sewed the
buttonholes one after another, with the thread lying loose between them, as
seen in extant examples. It is a very fast and practical way to sew buttonholes,
not having to fasten the thread after every one, or letting it travel between
the layers of cloth, though perhaps not the prettiest look…

All sewing is done by
hand with waxed linen thread, using stitches found in extant medieval clothing.

One of the gores, sewn into front and back.
The seam allowances and hems are rather narrow, ranging between 5-7 millimetres.

I submit this as a HSM
challenge, though it’s more than a week late - the whole family got ill, so time
and energy for sewing was a bit limited there for a while.
The Challenge: #5
Practicality
Fabric: Melton wool.
Pattern: My own, based
on period kyrtles.
Year: Roughly late
1300’s.
Notions: Linen thread.
How historically
accurate is it? Decently – I don’t think it would stand out too much if sent
back in time. Though the cloth name Melton didn’t show up until 1823, the
quality existed during the Middle Ages - mine is machine woven though. The colour is OK for the period, but artificially dyed. The stitches are all period, as is the
construction.
Hours to complete:
Abut 15, including piecing the sleeves.
First worn: For the
pictures.
Total cost: If bought
new, the material would cost about 150 SEK ($18; £11,8; €16), but everything
was in my stash.

And terminology.... I've used to call this type of garment a cote in English, but I rather like the word kyrtle, as it's closer to the Swedish kjortel. Is there a difference, or are they just different words to describe the same thing? I wonder...
References:
Crowfoot, E.
Pritchard, F. & Stainland, K. (2001). Textiles and Clothing c.1150-c.1450.
Bury St Edmunds: Museum of London.
Nockert, M. (1985). Bockstenmannen, Och Hans
Dräkt. Halmstad och Varberg: Stiftelsen Hallands länsmuseer.
Østergård, E. (2004).
Woven Into the Earth. Denmark: Aarhus University Press.
Subscribe to:
Posts (Atom)