Friday, 21 October 2016

My First Broomstick

For the longest time I’ve wanted a broomstick of my own – what Harry Potter fan hasn’t? I never ran into the kind I wanted though (except for tolerable looking kid’s Halloween brooms, but unless I got one with the intention that it would be the boys’ toy broom, that would just be silly), so in the end I researched what it would take to make my own. And now I have made one!


 Last spring I found a good sized branch, broken off from a tree at the playground, and thought “perfect”. It wasn’t quite perfect really: it was riddled with worms and such, but apart from that the wood was sound, so I decided I’d use it anyway. When you don’t have forests close by or a car to get you there, you have to accept what’s available.


 I brought the branch home, removed the bark, sawed off the parts I didn’t want.


I smoothed the stick with a knife and then sand paper.


 I stained it with very strong tea, and I set it aside (indoors) for a few months.


For the business end of the broom I collected birch twigs. You are really supposed to collect them before the sap rises in spring, but I didn’t look into broom making until much too late, and couldn’t wait until next year to get started. If I make another broom I’ll try to be more forward-looking.

Close to our home there is a field that seem to have been in disuse for several years, long enough that young birches have had the time to grow a lot taller than me. I felt that I could take twigs from there without anyone minding. When I was sort of content with what I had collected, I stripped them of leaves and put them in the shed to dry over the summer – but not until I had laid them out loosely together with the stick to get an idea of what the finished broom would look like.


A couple of weeks ago I finally assembled the broom. 

I gathered up the birch twigs one by one, and made them into a tight bundle, where the ends of the twigs ended at about the same length, and when possible pointed inwards rather than outwards: when my hand wasn’t enough to hold the bundle together I strapped a belt round it, and continued to add twigs. 


When that was done I used hemp rope to tie them together. I wrapped the rope round a stick to make a handle – that helped me pull the rope really tight without hurting my hands.


I then sawed off the twigs at the top, to make a neat finish. Note to self: if you want a fuller broom, gather lots more twigs than you think you'll need next time, they shrink as they dry.


I cut the stick down a bit, as it was too crooked to easily put the bundle of birch twigs on. It ended up slightly too short, so maybe we’ll have to pretend it was a broom one of us got as a teen, and as we prefer Floo powder or Apparition to flying anyway, we never really bothered getting a new one.
The bottom of the stick was sharpened to a point to make it possible to get it into the tightly bundled up birch twigs. I had to taper the sharpened end even more then in the picture for it to work, but I got there in the end.


When both parts of the broom were finished, I put the sharpened end of the stick into the top of the twig bundle. With the broom upside down, holding on to the bundle, I then pounded the broom, handle first, into the ground, driving the handle into the middle of the birch twig bundle. After a while it felt really sturdy and secure. I washed of the surplus tea - somehow I never got round to that before - and that was that, my very first broom!


It wasn’t really all that difficult, though of course mine isn’t very pretty, having neither the proper tools nor the experience. It’s certainly not a Nimbus or a Firebolt, but all in all I’m happy with it, especially seeing as I never was very good at working with wood.

And now - UP!


Any of you ever tried making a broom? Or have you got a nice ready-made one? Please share links!

Saturday, 15 October 2016

A Twig Candle Holder

I’m feeling a bit foolish, almost embarrassed. The reason is that I fell for the Pinterest pressure: I made a twig candle holder, something I have thought was quite silly. Sigh. I will totally blame this on being ill.


I made it from material sawed off from the bunch of birch twigs that is the business end of the broom I made last week (something I still have to take pictures of and blog about), which pleased me, as I love not to waste perfectly good materials.

For the jar I used an old mayonnaise jar, as I don’t have anything fancier I’d like to waste on this. As it happened, I didn’t want to eternally commit this jar either, so instead of gluing the twigs on, I taped them. It was a bit fiddlier this way, but if I want to use the jar for something else, I can just peel twigs and tape off. I couldn’t tape all the twigs on in one go; four were as many as I could conveniently control. The tape is attached to the jar after every four twigs, and is anchored to the previously taped part at the other end. It makes the twigs very secure. I left the leaf and tiny twig as I thought they added a bit quirkiness to it.


To cover the tape I tied twine around it, something I had planned to do in any case as I like that better than just the twigs. I was thinking about using ribbon, but I didn’t have any that felt worked, or that I was willing to sacrifice to this project. Depending on the season I can add other embellishments as well.


So that was that: a quick little project to entertain me when being ill and not quite in the mood for serious crafting or sewing. In the end, it did actually turn out rather nice, I think. Tobias liked it too, but remarked how in our culture we take good light so for granted, that we spend time covering it up to get "mood lighting". There is much truth in that.

Have you ever fallen for the pressure and made something you saw on Pinterest, even if it wasn't really something you were too excited about? Did it grow on you, or was it a total fail?

Thursday, 13 October 2016

A Forest in a Bell Jar

In my last post I showed some of the décor I’ve made for autumn, including a miniature scene of a forest in a bell jar. Here is how I made it.


First I “shopped my house” for a suitable bowl. The one I decided on is a fairly shallow ceramic one. I had picked some pleasantly knotty and twisted twigs from a plum tree. This particular bowl was obviously too shallow for the twigs to stand up properly, even when stabilized with soil, so I wrapped aluminium foil round the bottom of the twigs, then flattened the foil to make a base. Of course I forgot to take a picture of this vital step – if I remember I’ll take one when I take the scene down.

When I was happy with where the trees stood in the bowl I filled it with dry soil from my flowerbeds. I wanted this to be a very low cost project, and using mostly materials I could just toss back out into nature afterwards. The aluminium foil is an exception; that will go to recycling. A nice looking rock that I had selected earlier was also positioned in the bowl.


I picked a handful of grass from our slightly overgrown lawn. Some of it I cut into small pieces, the rest I let as was. I put it all on a baking tray and dried it in the oven on low heat. 


I took these strands of longer grass, divided it into five small bunches, that I “planted” here and there in the soil.


When I was happy with how the scene looked I took the finely cut grass and sprinkled this all over the scene, to cover the forest floor.


To give more texture and interest I then sprinkled tiny dried leaves that I had saved when trimming our boxwood, and the myrtle plants (daughter and grandchildren of the one I wore as a wreath at my wedding) I have all over the house. I let some leaves fall on the rock, to give an impression that they had fallen from the trees.


I then took small sprigs that I had saved and dried when I trimmed said boxwood. These were also planted.


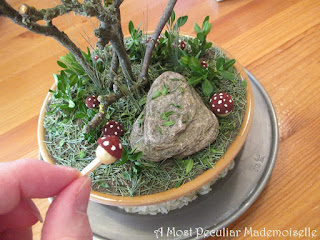
As a finishing touch I added small toadstools I made. I’ll make a separate tutorial for those. These will not be tossed out; I’ll keep them for future decorating purposes.


I am so happy with how this turned out – the pictures don’t do it justice. Everything looks nice when in a bell jar, but there is something special about miniatures.


What do you think of it? Have you made something similar, or something different but also fun? Please share a link!

Friday, 7 October 2016

Autumn

It has been an unusually long summer here, and almost every day of September has been warm enough for wearing short sleeves and running barefoot, something the children have taken every advantage of. Now however, there has been a turn in the weather, and it’s decidedly autumn. While the summer itself wasn’t a good time for me this year, I love autumn, it is my favourite season, and I have decorated for it using lovely things found in nature.

I put all kinds of greenery and berries in an empty jar; there is oak, maple, rosehip, boxwood, and some things I don’t know the names of. In a glass container I put glasses that I use as candle holders and decorated with chestnuts, acorns, and cones from pine and spruce. The cones will be used for Christmas decorations too in a couple of months. 

Having the tealights lit would have made a prettier picture, but one has to 
consider the fire hazard an all that - they were too close to the greenery to be lit.

In the kitchen lamp I have hung hops, more spruce cones and a string of rosehip. There are various smaller plants, neatly labeled, hung there as well – these things are primarily for our Halloween party, but they look pretty for autumn as well. 


 In a bell jar I created a little woodland scene – here's a post on how I made it.


This month I’ll be teaching a class on making Empire/Regency working class dresses, and I’m so excited! It’s rather a small class (but for a small group of real nerds, lower class is not the most popular thing amongst those doing 19th century in Sweden – not yet anyway), but I’ll be happy to see the finished dresses all the same.


Preparations for Halloween are coming along; the Hogwarts House wall hangings are up, as is the display of Muggle money. Plans and preparations for food is also being made.

I have joined a letter exchange role play, set in the world of Jane Austen’s England, 1816. I’m corresponding with an old “schoolfellow” and a young “niece”. The character I have chosen for myself is a clergyman’s wife by the name of Mary Carter in a village in Surrey, and it is great fun trying to think and express myself in a way familiar to anyone who have read Jane Austen.

See what I meant by fire hazard? 
My "niece" had a bit of an accident with my letter.

So far the autumn has treated me a good deal better than the summer did. I hope it will last :)